My Collected Notes
This is just a page of some of the problems that I have encountered and how I have solved them. Before trying any of the following, please read the disclaimer at the bottom of this page:
Table of Contents:
- Slackware Linux Related
- General Items
- Stevens Related
Upgrading Firefox Without a Package
or: How I Came to Stop Grimmacing and Love the Firefox Release Schedule
If you use 32-bit Slackware Linux, you can download the package from Mozilla easily. If, however, you use 64-bit Slackware Linux, then you need to use Mozilla’s user-contributed packages repository via FTP. Download the file named firefox-n.e.w.tar.bz2 where n.e.w would look something like 14.0.1. If you have a slow internet connection like I do, this might take a few minutes.
Depending on your architecture, your directory structure will look like /usr/lib/firefox-o.l.d or /usr/lib64/firefox-o.l.d. (I’m sure you can figure out which is which.) This directory contains your last version of firefox installed. I will refer to it from now on as $OLD_FFX_DIR. I will also assume that you have the tar file containing the new version in your $HOME directory.
At this point, you should check for a plugins directory in $OLD_FFX_DIR and save that.
# working in /usr/lib/firefox-o.l.d or /usr/lib64/firefox-o.l.d
$ sudo mv plugins/ ..
$ cd ..
# now working in either /usr/lib or /usr/lib64
Then unpack the new version of firefox from your home directory and rename it.
$ sudo tar xf $HOME/firefox-n.e.w.tar.bz2
$ sudo mv firefox/ firefox-n.e.w/
Assuming you saved the plugins directory from your old installation you then do:
$ sudo mv plugins/ firefox-n.e.w/
Now just change into /usr/bin so you can replace the symlink to firefox:
$ cd ../bin
# now working in /usr/bin regardless of architecture
$ sudo mv firefox firefox-old
$ sudo ln -s $NEW_FFX_DIR/firefox firefox
This allows you to test out the new version of firefox before upgrading entirely. If you don’t like it, just remove the new symlink and move the old one back. (You will also have to place your plugins directory back into the old installation.) If you like the new version you can remove the old symlink and directories.
Of course doing this all by hand each and every time can be confusing and tiresome. There has to be a better way, and there certainly is. I wrote a simple bash scrip to automate this for you (and me). It’s available for download here. Be aware that I’m licensing this under the MIT license. Please read the terms of the license before using the script.
Updating Adobe Flash Player
Firefox on Slackware Linux
In your original install image of Slackware in a directory called extra/ is what is called a SlackBuild. You should copy this file over into your installation so you can edit this very file every time you need to upgrade (or install) flash.
I personally keep a directory for items I plan to compile from source (or pseudo source in this case). I keep the flashplayer-plugin.SlackBuild in a sub-directory of the source dir. You should download the latest flash into this directory (you will want the file of the type .tar.gz and configured for the proper architecture, although flash usually detects it for you).
Most recently (25 Nov 2011), I downloaded the 64 bit version to install and the file was named install_flash_player_11_linux.x86_64.tar.gz and the version the flash site gave me was 11.1.102.55 so at the top of the slackbuild file I changed SRCVER and BLDVER to 11_1 and 10255 respectively. Then because the SlackBuild that comes with 13.37 is slightly antiquated (as you can see near the top of the file) I changed SOURCE to
SOURCE="$SRCDIR/install_flash_player_11_linux.x86_64.tar.gz"
Then run the slackbuild and install it. You should notice that it installed libflashplayer.so to either /usr/lib/mozilla/plugins or /usr/lib64/mozilla/plugins. For me, I also had to cd into the firefox directory (see above) and make the plugins directory and then link that shared object (so) in the plugins directory for firefox to work (8.0.1 at the moment). The above should look as follows:
user@darkstar:/usr/download/source/flashplayer$ sudo \
./flashplayer-plugin.SlackBuild
[snip]
user@darkstar:/usr/download/source/flashplayer$ sudo mv \
/tmp/flashplayer-plugin-11_1.10255-x86_64-1.txz ./
user@darkstar:/usr/download/source/flashplayer$ sudo installpkg \
flashplayer-plugin-11_1.10255-x86_64-1.txz
user@darkstar:/usr/download/source/flashplayer$ cd \
/usr/lib64/firefox-x.y.z # or /usr/lib/firefox-x.y.z
user@darkstar:/usr/lib64/firefox-x.y.z$ sudo mkdir plugins
user@darkstar:/usr/lib64/firefox-x.y.z$ cd plugins/
user@darkstar:/usr/lib64/firefox-x.y.z$ ln -s \
/usr/lib64/mozilla/plugins/libflashplayer.so ./ </pre>
After restarting firefox, this should work fine.
xrandr in Slackware 13.37
Using a second monitor with your laptop
While working in the Linux Lab at Stevens, I noticed there were a couple old monitors sitting around which were not connected to any desktops. I wanted to use one as an extension to my laptop just to figure out how to do it. The first thing I did was determine what the ‘screens’ were called by xrandr. My output looked something like this:
icordasc@laptop:~$ xrandr
Screen 0: minimum 320 x 200, current 3200 x 1200, maximum 8192 x
8192
LVDS-1 connected 1920x1200+0+0 (normal left inverted right x axis y
axis) 331mm x 207mm
   1920x1200      60.0*+   59.9
   1920x1080      60.0
   1600x1200      59.9
   1680x1050      60.0
   1400x1050      60.0
   1280x1024      59.9
   1280x960       59.9
   1152x864       60.0
   1024x768       59.9
   800x600        59.9
   640x480        59.4
   720x400        59.6
   640x400        60.0
   640x350        59.8
DVI-I-1 disconnected (normal left inverted right x axis y axis)
HDMI-1 disconnected (normal left inverted right x axis y axis)
VGA-1 disconnected (normal left inverted right x axis y axis)
After logging into my laptop, I plugged in the VGA cable and ran the following command.
xrandr --output LVDS-1 --auto --output VGA-1 --auto --right-of \
LVDS-1</pre>
In short, you’re setting your default (output) screen (LVDS-1 here) to be the automatic size and then setting ‘output’ VGA-1 to be automatically sized and placed logically to the right of the original screen. I could have made it to the left, above or below with --left-of, --above, and --below respectively. But I didn’t care to try that (although I will one day).
To disconnect the monitor without causing problems with X11, just run:
xrandr --output LVDS-1 --auto --output VGA-1 --off
Encrypted Google
There are a few ways of doing this. The first is HTTPS Everywhere which is a Firefox add-on. The second is to edit the google.xml file yourself. This file can be found (on Slackware at least) in /usr/lib/firefox-x.y.z/searchplugins/. Then open the file as root (or with sudo) with your favorite editor, e.g.,
sudo vim /usr/lib/firefox-x.y.z/searchplugins/google.xml
In lines 6 and 7, you’ll see that the search plugin is issuing GET requests to Google. You can change these so that they look something like this:
template="https://suggestqueries.google...",
template="https://www.google.com/search">
for lines 6 and 7 (respectively). I believe either will ensure the fact that Mozilla receives the proper credit for someone searching using firefox.
Update
Upon further review, this seems to break the suggestions feature. That said, you should weigh the benefits of encrypted search versus unencrypted search and if you find yourself missing that feature, you can just edit that file again to make them use plain Google.
Colorschemes in VIM
I use vim. I happen to use it a lot actually. So eventually, I became tired of the default colorscheme and the others that came with vim weren’t aesthetically pleasing to me. In my quest to find a colorscheme that looked good both in the terminal and in gVim, I noticed a problem. My ~/.vimrc looked something like:
" vim: ft=vim ts=3 sw=3
" snip
set t_Co=256
colorscheme wombat256
" snip
syntax enable
As a result I started seeing errors after invoking vim at the commandline:
user@darkstar:~$ vim .vimrc
Error detected while processing /usr/share/vim/vim73/syntax/synload.vim:
line   19:
E185: Cannot find color scheme wombat256mod
What this means is that while trying to load the synload.vim file, a variable declaration inside of wombat256.vim was causing a problem. The line in question was:
let colors_name = "wombat256mod"
The issue seems to be with trying to load the colorscheme before enabling syntax highlighting. The fix? Quite simple actually:
" vim: ft=vim ts=3 sw=3
" snip
syntax enable
colorscheme wombat256
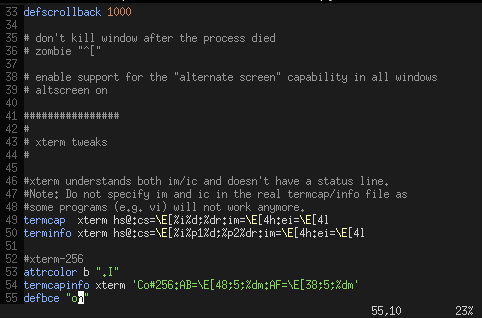
Making screen behave like xterm-256
So in a similar vein as the above Colorschemes in VIM section, I was trying to force screen to properly display the colorscheme I had worked so hard to find. Some suggestions I found were to add the set t_Co=256 line to my ~/.vimrc or to invoke vim with -T xterm-256colors. Neither worked. While googling I came across <a href=”http://www.softpanorama.org/Utilities/Screen/screenrc_examples.shtml“>this website</a> which did not deal with the problem directly, but which did have the solution in “Phil’s .screenrc”.
To enable 256 color emulation in screen, simply add the following three lines to your ~/.screenrc:
attrcolor b ".I"
termcapinfo xterm 'Co#256:AB=\E[48;5;%dm:AF=\E[38;5;%dm'
defbce "on"
I do not know enough to explain the meaning of these lines, I’m not a screen expert, but I thought this might make it easier for someone else to Google for and find. And for anyone who is skeptical, here is >wombat256_ making vim running inside of a screen session look gorgeous.
Python Classes
Slackware prefers stability often over keeping necessarily up-to-date. An example of this is how even Slackware 13.37 is distributed with Python 2.6.x instead of 2.7. Yes you can install 2.7 and 3 along side of the 2.6 version but unless you’re a professional python developer, who needs three versions? I have python 3 installed simply to play with the future installation, but I never bothered installing 2.7 as well.
While working on something for fun, I noticed a large difference in python 2.6 and 3.0. In 2.6, if you declare a class, it does not assume that you inherit from the object class and then any subclasses of that class do not work. For example:
class A:
    def foo(self):
        print("Foo")


class B(A):
    def foo(self):
        super(B, self).foo()
        print("Bar")


b = B()
b.foo()
Will not work in 2.6 but will in 3.0. For the above snippet to work in 2.6, you need to explicitly state that A is inheriting from object, i.e.
class A(object):
    def foo(self):
        print("Foo")


class B(A):
    def foo(self):
        super(B, self).foo()
        print("Bar")


b = B()
b.foo()
Naturally, this will also work in sys.version_info > (2, 6).
C Macros
While learning C, I learned that macros could be dangerous so I was always wary of using them unless I had to (for example when using the GTK library). Last week, a friend of mine asked me if I could design a macro that would insert // if something were defined and would not insert anything if the variable were not defined. The solution was easy.
#ifdef DEBUG
#define DBGONLY //
#else
#define DBGONLY
#endif
Clearly, he wanted to manage when he would print out debugging information, so his code (when read by mere humans) would look like
int func(void){
    /* Variable declarations */
    DBGONLY printf("Debugging information.\n");
    /* Rest of function */
}
When interpretted by the preprocessor, that function can evaluate to two different things depending on how he compiles the program. If he uses the -D flag with option DEBUG it will look like:
int func(void){
    /* Variable declarations */
    printf("Debugging information.\n");
    /* Rest of function */
}
Thus enabling “Debugging information” to be printed and giving the developer more information to fix problems. Otherwise, it will look like
int func(void){
    /* Variable declarations */
    // printf("Debugging information.\n");
    /* Rest of function */
}
However, I like to ensure that my code will compile in as many places as possible so I compile against older C standards, particularly ones where // isn’t valid language for commenting. This made me come up with a second macro.
#ifndef DEBUG
#define DBGONLY(a) /* a */
#else
#define DBGONLY(a) a
#endif
If you’re unfamiliar with how this would work, if I define the macro ‘DEBUG‘, it will just replace what it wraps with itself. If the macro is not defined, it will validly comment it out. So that same function would look like this:
int func(void){
    /* Variable declarations */
    DBGONLY(printf("Debugging information.\n");)
    /* Rest of function */
}
Without the commandline option -DDEBUG, the function looks like:
int func(void){
    /* Variable declarations */
    /* printf("Debugging information.\n"); */
    /* Rest of function */
}
With it, the function will print the debugging information. This seemed to amaze my friend and I thought it was a clever way of avoiding my usual syntax of:
int func(void){
    /* Variable declarations */
#ifdef DEBUG
    printf("Debugging information.\n");
#endif
    /* Rest of function */
}
Which is needlessly verbose and artificially inflates the line count of a file. Naturally anything that makes the code easier to read and write is something I like to employ.
Mounting storage01 in linux
This took me a bit of googling to find once and has been a great deal of help since. This will work on the linux lab machines as well as personal linux machines provided you have smbmount installed. It’s a nice little one-liner. Also, I’ll assume that you have a directory that you can mount to. For example, on my laptop I have /mnt/storage01 and on the linux lab I have /home/icordasc/storage01/.
smbmount //storage01.stevens.edu/public ./storage01 -o \
user=username,domain=campus
This will then prompt you for a password. You would then enter the same password you use for the wireless access points at Stevens. Once this completes successfully, feel free to explore your now read-only directory. (By which I mean you cannot add anything to it, but can read anything from it.
Advantages to this
If you do this in the linux-lab and logout, as long as you know which machine you logged into, you can scp files from that directory like so:
# local machine
scp <machine_name>.cs.stevens.edu:~/storage01/Matlab\\\ Archive/\
Matlab2011A/Activation.txt ./
So long as that machine doesn’t shut down, you can keep the directory mounted and log back into that machine later without it being changed.
If you plan to not log into that same machine again later but you want to have the directory mounted, simply use
smbumount ./storage01
So you can remount this. Also you can add to your ~/.bash_profile file, the following line:
alias storage01mount='smbmount //storage01.stevens.edu/public \
./storage01 -o user=username,domain=campus'
Disclaimer
(My Modified BSD License)
THIS INFORMATION IS PROVIDED BY THE COPYRIGHT HOLDERS AND CONTRIBUTORS “AS IS” AND ANY EXPRESS OR IMPLIED WARRANTIES, INCLUDING, BUT NOT LIMITED TO, THE IMPLIED WARRANTIES OF MERCHANTABILITY AND FITNESS FOR A PARTICULAR PURPOSE ARE DISCLAIMED. IN NO EVENT SHALL THE COPYRIGHT HOLDER OR CONTRIBUTORS BE LIABLE FOR ANY DIRECT, INDIRECT, INCIDENTAL, SPECIAL, EXEMPLARY, OR CONSEQUENTIAL DAMAGES (INCLUDING, BUT NOT LIMITED TO, PROCUREMENT OF SUBSTITUTE GOODS OR SERVICES; LOSS OF USE, DATA, OR PROFITS; OR BUSINESS INTERRUPTION) HOWEVER CAUSED AND ON ANY THEORY OF LIABILITY, WHETHER IN CONTRACT, STRICT LIABILITY, OR TORT (INCLUDING NEGLIGENCE OR OTHERWISE) ARISING IN ANY WAY OUT OF THE USE OF THIS INFORMATION, EVEN IF ADVISED OF THE POSSIBILITY OF SUCH DAMAGE.